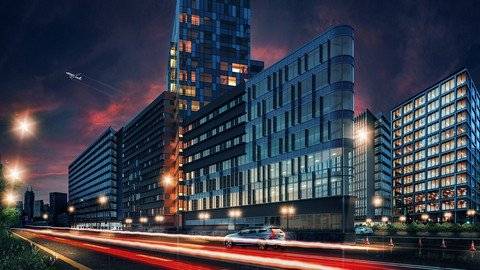
Adobe Photoshop中建筑3D渲染的后期制作(后期处理),从初学者到高级。在本课程中,从初级到高级,您将学习如何在Adobe Photoshop中后期制作3D渲染照片。基本上,你将学习3种模式:你有你的最终渲染,只需要一些调整,如颜色,灯光,相机,和轻微的固定,如颜色烧伤。你渲染了你的主体和元素,但是需要添加额外的元素,调整和匹配最终的结果。您刚刚渲染了基本的几何图形,并想要制作总的场景元素和环境,如天空、植物、人物、大气、其他建筑、车辆等。Architecture Post Production In Photoshop Zero To Advanced
在本课程中,您将一步一步地学习所有内容,包括完整描述、提及快捷方式、为什么以及如何使用professional等工具,以及许多提示和技巧。通过本课程,您不仅可以提高自己的技能,还可以提升自己的工作速度和工作流程,并且有足够的信心在更短的时间内以更好的效果完成所有专业任务。在本课程中,我将教你非破坏性工作流编辑的所有操作,使你能够轻松地重新调整和制作同一项目的不同版本。本课程也包含了许多对你的项目有用的独特资源,比如笔刷云和灯光。通过本课程,您将成为一名真正专业的建筑后期制作Adobe Photoshop图片编辑大师。
MP4 |视频:h264,1280×720 |音频:AAC,44.1 KHz
语言:英语|大小:13 GB |时长:10小时48分钟
你会学到什么
Adobe photoshop中的后期制作
Adobe Photoshop无损编辑工作流程
添加和删除主题、颜色和光线匹配
做不同难度的多个项目
制作环境、照明、色彩调节
组合渲染元素
使用不同的颜色模式和深度
修复渲染问题和相机
制作各种相同的渲染快照
以及更多的提示和技巧…
要求
基本的计算机知识
课程目录:
第一部分:第一章
讲座1推广视频
第2讲分析_项目
第3讲打开图像并保存PSD
第4讲用相机Raw滤镜固定相机角度
第5讲通过自由变换工具固定相机角度
第6讲用相机原始滤镜修复烧伤的表面
第7讲手动修复烧伤表面
第八讲天空自动替换
第九讲天空手动替换
第10讲在水池上添加天空反射
第11讲整体色彩调整
第12讲细节增强和添加晕影效果
第13讲为印刷和网络准备文件
第二部分:第二章
第14讲简介:准备项目文件
第15讲为天空替换和整体光线调整添加Alpha
第16讲在窗户上添加天空反射
第17讲添加鸟和树枝
第十八讲添加雨滴方法1
第19讲添加雨滴方法2
第20讲地面反射
第21讲添加薄雾
第22讲添加树和背景
第23讲添加草
第24课添加人员
第25讲整体调整
第26讲最终调整
第三部分:第三章
第27讲简介,调整
第28讲调整草色灯
第29讲调整天空和植被
第30讲添加神光
第31讲添加背景和树线
第32课添加鸟类
第33讲最终调整和出版
第四部分:第四章
第34讲简介:消失点
第35讲天空置换
第36课添加建筑物
第37讲添加街道沥青
第38课添加路障
第39讲添加草
第40讲添加植物
第41讲修整道路沥青
第42讲添加灌木
第43讲路灯第一部分
第44讲路灯第二部分
第45课添加汽车
第46课修复窗口透明度
第47讲建筑再调整
第48讲添加交通锥
第49讲室内天花板灯
第50讲添加内部细节
第51讲清理建筑物
第52讲添加飞机
第53讲建筑反思
第54讲添加汽车和交通锥反射
第55讲添加街灯和灌木丛的倒影
第56课迁移到新文档以获得更好的性能
第57讲为灯光添加镜头光晕
第58讲添加车灯
第59讲添加光迹
第60讲项目最终调整
第五部分:第五章
第61讲透视扭曲
第62讲高级中的消失点
第63讲智能对象技巧
第64讲内容感知填充
第65讲色调饱和度技巧
第66讲木偶曲速
第67讲快速切换模式
第68讲透视阴影介绍
谁需要提高渲染镜头质量,谁没有时间在3D场景中添加元素进行渲染,谁没有高性能计算机来制作巨大的场景和元素,谁需要学习photoshop进行后期处理,谁希望加快工作流程并成为专业人士
Post production (Post Processing) for architectural 3D Rendering in Adobe Photoshop from beginners to Advanced.
What you’ll learn
Post production in Adobe photoshop
Adobe Photoshop non-destructive editing workflow
Adding and removing subjects, color & light matching
Do multiple project with different difficulty level
Making environment, lighting, color adjusting
Combining render elements
Working with different color modes and depth
Fix render issues and camera
Make a variety of the same render shot
and many more tips and tricks …
Requirements
Basic computer knowledge
Description
In this course, you will learn from very beginner to advanced how to post-production your 3D render shots in Adobe Photoshop.Basically, you will learn 3 modes:You have your final render and just need some adjustments such as color, lighting, camera, and minor fixing like the color burn.You rendered your main subject and elements, but need to add extra elements, adjusting and matching the final result.You just rendered basic geometry raw and want to make the total scene elements and environment such as sky, plants, people, atmosphere, other buildings, vehicles, etc.In this course, you will learn all, step by step with full descriptions, mention shortcuts, why and how to use tools like professional, and many tips and tricks.Not only by passing this course you will improve your skills but also your working speed and workflow will be upgraded and you will get enough confidence to do all professional tasks in less time with better results.In this course, I teach you all actions with non-destructive workflow editing which make you able re-adjust and make different versions of the same project easily.This course also contains many useful and unique resources for your projects such as brushes clouds and lights.By passing this course you will be a true professional Adobe Photoshop photo editing master for architectural post-production.
Overview
Section 1: Chapter 1
Lecture 1 Promotion Video
Lecture 2 Analyzing_Project
Lecture 3 Open Image and Save PSD
Lecture 4 Fixing Camera Angle with Camera Raw Filter
Lecture 5 Fix Camera Angle by Free Transform Tool
Lecture 6 Fix Burned Surfaces with Camera Raw Filter
Lecture 7 Fix Burned Surfaces Manually
Lecture 8 Sky Replacement Automatically
Lecture 9 Sky Replacement Manually
Lecture 10 Add Sky Reflection on Waterpool
Lecture 11 Overall Color Adjustments
Lecture 12 Detail Enhancement and adding Vignette effects
Lecture 13 Preparing file for Print & Web
Section 2: Chapter 2
Lecture 14 Introduction: Preparing Project File
Lecture 15 Adding Alpha for Sky Replacement & Overall Light Adjusting
Lecture 16 Add Sky Reflection In Windows
Lecture 17 Add Birds & Branches
Lecture 18 Add Raindrops Method 1
Lecture 19 Add Raindrops Method 2
Lecture 20 Floor Reflection
Lecture 21 Adding Mist
Lecture 22 Adding Tree & Background
Lecture 23 Adding Grass
Lecture 24 Adding Peoples
Lecture 25 Overall Adjustments
Lecture 26 Final Adjustments
Section 3: Chapter 3
Lecture 27 Introduction, Adjusting
Lecture 28 Adjust Grass & Color Lights
Lecture 29 Adjusting Sky & Vegetations
Lecture 30 Add God rays
Lecture 31 Adding Background & Treelines
Lecture 32 Add Birds
Lecture 33 Final Adjustments & Publishing
Section 4: Chapter 4
Lecture 34 Introduction: Vanishing Point
Lecture 35 Sky Replacement
Lecture 36 Add Buildings
Lecture 37 Add Street Asphalt
Lecture 38 Add Roadblocks
Lecture 39 Add Grass
Lecture 40 Add Vegetation
Lecture 41 Finishing Road Asphalt
Lecture 42 Add Bushes
Lecture 43 Street Lights Part 1
Lecture 44 Street Lights Part 2
Lecture 45 Add Cars
Lecture 46 Fix Windows Transparency
Lecture 47 Buildings Re-adjustments
Lecture 48 Add Traffic Cone
Lecture 49 Interior Ceiling Lights
Lecture 50 Add Interior Details
Lecture 51 Cleanup Buildings
Lecture 52 Add Airplane
Lecture 53 Buildings Reflection
Lecture 54 Add Cars & Traffic Cones Reflection
Lecture 55 Add Street Lights & Bushes Reflection
Lecture 56 Migrate to new Document for better performance
Lecture 57 Add Lens Flare for Lights
Lecture 58 Add Car Lights
Lecture 59 Add Light Trails
Lecture 60 Project Final Adjustments
Section 5: Chapter 5
Lecture 61 Perspective Warp
Lecture 62 Vanishing Point in Advanced
Lecture 63 Smart Objects Tips
Lecture 64 Content Aware Fill
Lecture 65 Hue Saturation Tips
Lecture 66 Puppet Warp
Lecture 67 Quick Switch Mode
Lecture 68 Perspective Shading Intro
Who need to improve render shot quality,Who have no time to add elements in 3D scene to render,Who don’t have high performance computer to make huge scene and elements,Who need to learn photoshop for post processing,Who wants to speedup workflow and be a professional
1、登录后,打赏30元成为VIP会员,全站资源免费获取!
2、资源默认为百度网盘链接,请用浏览器打开输入提取码不要有多余空格,如无法获取 请联系微信 yunqiaonet 补发。
3、分卷压缩包资源 需全部下载后解压第一个压缩包即可,下载过程不要强制中断 建议用winrar解压或360解压缩软件解压!
4、云桥网络平台所发布资源仅供用户自学自用,用户需以学习为目的,按需下载,严禁批量采集搬运共享资源等行为,望知悉!!!
5、云桥网络-CG数字艺术学习与资源分享平台,感谢您的赞赏与支持!平台所收取打赏费用仅作为平台服务器租赁及人员维护资金 费用不为素材本身费用,望理解知悉!


评论(0)